Wednesday, January 28, 2009

Home Sweet Home - Spoiler Pictures

ok.. this post is a bit out of order, but to the friends and families who don't have the opportuntiy to swing by the new place in person, we wanted to post some "after" pictures of the three projects we took on during the week between closing and the move.


Master Bedroom.
  • Stripped wallpaper
  • Patched, primed and painted walls and ceiling
  • Repaired window sill and base trim
  • Removed purple carpet
  • Had floors sanded and sealed
  • Purchased our first bed room set ( which we LOVE ), yes we are grown up now
Before:


Empty room and new floors:


After!:


Yes, that's the same room. I apologize for the blurry quick pictures... still shaking with excitement. I will take some better pictures and post them soon.

Guest Bedroom
  • Stripped wallpaper - the dreaded balls
  • Patched, primed and painted walls
Before:
Empty room:


After:


Yes, that's the same room too! The color of the room is "Cake Stand Blue" and seems to shift hues during the day; the afternoon light during this time of the year makes the room look very blue, but all shades are very peaceful yet modern. We wanted to make a space where our guests could get away and feel like they were on a mini-retreat. We are planning on painting the trim a light, white color ( not true white )


China Cabinet:
  • Patched, primed and painted walls
Before:
Yes.. that is green... an odd green at that.. not quite the best hue to go with the ultra red dining room walls

After:


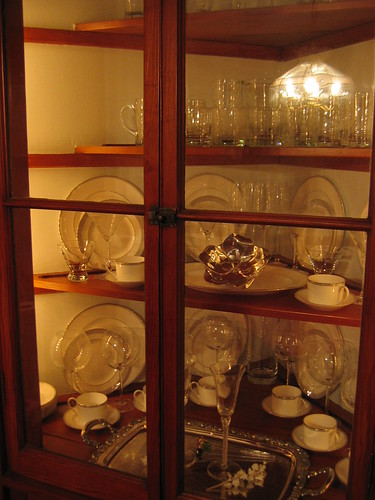
The color we chose is Skeleten Key, which is a VERY light silver blue, matching the trim of the wedding china. Thanks to Momma Bear for organizing the china cabinet Perfectly!

So.. that's the mini spoiler.
Much thanks again to ALL of our families and freinds for all their help and support!
More to come!

Moving Day - Part one

It has arrived!
After a frantic week of boxing, organizing, taping, packing and plastic wrapping ( Sister wins for supplying us with plastic wrap) at our "old" apartment, and stripping, patching, priming and painting at our new home we have reached the fateful move date.
Our movers, who we had used in two previous moves, arrived at our apartment on a Saturday morning , faced with unloading a third floor apartment filled with at least 60 packed boxes, furniture and a piano ( on the first floor ).
Thanks to wifey to sequestering excellent boxes from her place of business!

Within 6 hours, the apartment was loaded in the truck, transported to the new home and unloaded!

They do an amazing job!


Not part of the moving crew - more part of the organization team Auntie and Remote swooped in and tackled an appropriately pink tagged kitchen


By the end of the day, the majority of the boxes were empty and broken down. A well deserved rest and meal in our new dining room was had by all!

Sorry about the chew shot wifey....

Sunday, January 25, 2009

ReHab Part Three - No More Balls

With the Master Bedroom well underway, we ( and by "we" I mostly mean Sister) took on the task of ridding the future guest room of the youth sports wallpaper. It wasn't as high quality as the paper in the Master Bedroom; something more akin to contact paper unfortunately. The task was a hard one, but Sister, T.C. Wifey and I succeeded in the end.

The balls slowly disappear - with the help of some elbow grease, the help of the Zinsser PaperTiger and a little more elbow grease, progress was made.

We also learned that the walls in this back bedroom are NOT plaster, but drywall - leading us to believe that this portion of the house is an addition to the original home

In the end, the paper came down, and with a little patching and scrapping, the balls were no more.

Thursday, January 22, 2009

ReHab Part Two - Master Bedroom

Given the somewhat tight timetable for prepping portions of the home prior to major moves and deliveries, added with that special " first-time-home-owner's-zest" we dove headlong into removing the old and bringing in the new!

The first priority was to strip the wallpaper from the Master Bedroom, prep the walls to receive primer and paint and remove the carpet so that the floors could be sanded and sealed.

Due to the age of the home, we did not know what to expect beneath the wallpaper. We were not even sure what the age of the paper was. And some cases in homes like these, it's the only thing holding up the old horse hair plaster walls.


Armed with a spray bottle of Zinsser DIF Wallpaer Stripper and a very weak Piranha wall paper scorer, we began the work of removing the paper. After a somewhat painful learning process on one portion of the wall, we learned that the high quality, thick vinyl paper did not need to be scored. Wetting down the vinyl portion of the paper along a seam line allows the first portion of the paper to peal off quite easily, leaving the paper backing which is glued to the wall. Applying copious amounts of diluted stripper to the paper back, letting is sit for about 5 minutes, then scrap / pealing the paper back from the wall completed the process. We were quite pleased to find that the majority of the plaster walls were in excellent condition, with a few structural / settling cracks at the corners.


We also did some primary investigation of the wood floors beneath the beautiful purple carpet. The floors are fir, and the floor in the Master Bedroom had been stained. There were a few furniture scratch marks in the center of the floor, possibly from an earlier bed.


During the stripping process, we noticed some settling in the window frame; the sill had fallen away from the rest of the frame. Now, not being from the "half-cheeked camp" of doing things, we decided to attack the problem with full force. what was exposed was a bit more work than expected...


The plaster had eroded away quite a bit, leaving the trim piece hanging on loosely. We also noted a decent air gap under the frame. Air is not necessarily a bad thing, and the area seemed quite dry, no wood rot, but the size of the gap was a bit worrisome. We decided to fill the gap a bit, leaving some room for air to circulate, patching the busted plaster, and reattaching the sill and trim correctly.

Once we reach completion of stripping and filling , we are planning to paint the room a simple, "Oatlands Subtle Taupe", nothing too strong. Stately and calm.

First Visitors

Outside of the previous owner dropping by to pick of some items he forgot, or the fuel oil guy pitching a pretty good deal to the new home owners, our first official guests were the "E's" including E., T. and the King. Also ever present in the new home are Sister and T.C., offering support, encouragement, and ready hands to help us out in every possible way!


The King overseeing the action


Sister braving the elements ( yes, just over 18 inches fell during weekend of our first works in the house. Stripping wallpaper plus shoveling snow equals "what muscle group is that and why is it screaming at me?!?!?")


T. contemplating

E. ever smiling

Wednesday, January 21, 2009

ReHab Part One

Not that the house needs any work at all to be livable, there are a few areas we want to upgrade and spruce up a bit. The majority of the work is located on the second floor in the bed rooms. Here is a picture of the "Master" bedroom... ( not quite sure what makes it a Master, as it is not that much larger than the second bedroom)


As you can see, we have a lovely vertical patterned wallpaper with a somewhat simple floral pattern matched with purple wall-to-wall carpet ( which we imagine finds its inspiration from the stained glass window color)

The other room in question is the "third" bedroom, which we plan to convert to the first guest room ( and future baby room - parents, if you are reading, don't faint... no, we are not pregnant yet... just planning ahead for the future). This room was the previous owner's young son's room as you can see from the themed wallpaper.

Yes, yes... the footballs, soccer balls and even the baseballs have to go.
Another short-list item is to paint the interior of the china cabinet, as we want a fresh, clean space to place our wedding china which has YET to see the light of day.

In summary, the task list we gave ourselves which needs to be completed in 7 days ( while packing the old apartment and working during the day) includes:
  • Strip wallpaper, patch, prime and paint the Master Bedroom
  • Remove carpet and have floors sanded and sealed
  • Strip wallpaper, patch. prime and paint the Guest Bedroom
  • Patch, prime and paint the china cabinet
Yes folks, it's going to be a fun filled week of aches and pains in parts of our bodies that we had NO idea even existed. But, as the work began, we found that Champagne - the power drink of New Home Owners everywhere- makes the work go by much quicker. We are truly locked and loaded to take on the challenges!


Tuesday, January 20, 2009

Instant Comfy

I have to admit, given the somewhat somber exterior and the homes proximity to a commuter rail line, we had some initial trepidation in going to the first open house. Once we got inside the home, I think we were both sure that this was going to be our first place. After spending some time, noticing that the rail line was not that audible, and seeing the opportunity present in the space, we were set to make an appropriate offer which was quickly accepted. The overall process was very smooth ( specters of our first home purchase attempt jump up here, thank you Tula for not being so helpful)

At any rate, here are some images of the home upon first visit. The original home owners furniture and decorations are shown here ( not quite our taste )


Living Room with knee-wall columns - fir hardwood floors throughout. Old "Rococo" Radiators through the house too.


Dinning Room - faux fireplace - built in china cabinet


Somewhat dated but very usable "European kitchen"

Stained glass detailing. The house has four stained glass windows


Foyer and stairs.
Upstairs are three bed-rooms and one of the two baths... also a walk up attic.

More pictures to follow soon

Welcome Home

It's a little difficult to really belive that our new home is actually OURS! All of our love to familiy and friends for amazing support to get us to this point... now, I guess, the fun begins.

After closing in the home office of our attorney at 9:00 am on a Friday, we headed to the town center for a celebratory brunch before heading to the house


Town Center


Standing outside of a local diner


Oh, that lovely sold sign...

So, we venture into our new home with the hopes an ambitions of the new year!
The next post will show some images from the interior!

Monday, January 12, 2009

Our First Home


Hello all and welcome to our first home.

I choose to start a little blog about our handsome 1915 American Foursquare because after I found out that we were indeed going to own a home of this type - I furiously began searching out info and history of such homes... The most interesting and useful information came from other home owners sharing their trials and tribulations / loves and losses with their homes; most being first time home buyers...

So, as a matter of “giving back" I decided to log the adventures that me and my wife have in our lovely new nest. I make early apologies for my tardiness in posting, but I hope in the end this little slice in the megabyte pie of blogging finds itself to be slightly useful and a tad entertaining.

Accompanying this post are a few images of our new abode.